Do Command Strips Damage Walls? A Complete Guide
Command strips are one of the most popular “no-drill” solutions for hanging items on walls. They are used in apartments, dorm rooms, rental homes, and even owner-occupied houses because they promise something everyone wants: damage-free hanging. But if you’ve ever removed one and seen paint peeling off, you already know the big question is real:
Do command strips damage walls?
The short answer is: they can, but most wall damage happens due to incorrect application, wrong strip type, poor wall condition, or improper removal. In this detailed guide, you’ll learn exactly when command strips damage walls, how to prevent it, what surfaces are safest, and how renters can protect their security deposit.
What Are Command Strips and Why Are They So Popular?
Command strips (commonly made by 3M) are adhesive strips designed to hold items on walls without nails or screws. Most versions include a “stretch-release” tab that allows you to remove the strip by pulling it downward, so it releases without tearing paint.
People love command strips because they are:
- Easy to use
- Affordable
- Widely available
- Great for renters
- Good for temporary decor (seasonal items, wall art, hooks)
However, “damage-free” doesn’t mean “mistake-proof.” The wall, paint quality, humidity, and removal method all matter.
Do Command Strips Damage Walls? (Honest Answer)
Command strips usually do not damage walls when:
- Walls are smooth and clean
- Paint is in good condition
- The correct strip weight rating is used
- The strip is removed the right way
Command strips can damage walls when:
- Paint is cheap or old
- The wall has texture
- The strip is overloaded
- Removal is rushed or incorrect
- The strip is applied to dusty or damp walls
So, yes—command strips can damage walls, but in many cases the damage is preventable.
Most Common Types of Wall Damage From Command Strips
Let’s break down what “damage” looks like. Not all damage is the same.
1) Paint Peeling
This is the most common problem. When the adhesive bonds strongly to the paint layer, removing it can lift paint.
Paint peeling happens more on:
- Flat/matte paint (common in rentals)
- Low-quality paint
- Old paint with weak adhesion
- Walls that weren’t primed properly
2) Drywall Paper Tear
Behind most painted walls is drywall with a thin paper layer. If the adhesive pulls off that paper, you’ll see a brown or rough patch.
This is more serious than paint peeling because it often needs:
- Spackle
- Sanding
- Primer
- Paint touch-up
3) Sticky Residue
Sometimes command strips leave glue behind, especially if they’ve been on the wall for months or years, or exposed to heat.
4) Texture Damage
Textured walls (orange peel, knockdown, popcorn) don’t allow even contact. When you remove the strip, it can pull the raised texture off the wall.
Which Walls Are Safe for Command Strips?
Not every surface is equal. Some surfaces are “safe,” others are risky.
Best surfaces for command strips
✅ Smooth painted drywall
✅ Glass
✅ Metal
✅ Smooth tile
✅ Finished wood
Surfaces where command strips may damage walls
⚠️ Textured paint
⚠️ Brick
⚠️ Concrete
⚠️ Wallpaper
⚠️ Unfinished wood
Important renter note: If your apartment has cheap paint or heavy texture, test one strip in a hidden corner first.
Why Command Strips Damage Apartment Walls More Often
Many renters complain command strips damaged their walls, while homeowners say they worked fine. That difference often comes down to wall quality.
Apartments frequently have:
- Quick paint jobs between tenants
- Flat paint (marks easily)
- Multiple layers of paint
- Weak paint bonding due to poor surface prep
This means the adhesive might pull off the top paint layer even when removed correctly.
How to Prevent Command Strips From Damaging Walls
If you want command strips to truly be damage-free, follow these steps carefully.
Step 1: Clean the Wall Correctly
Before applying, wipe the area with rubbing alcohol (isopropyl alcohol) and let it dry.
Avoid using:
- Soap + water (can leave residue)
- Wet wipes (often contain oils)
A clean surface improves adhesion and reduces uneven sticking.
Step 2: Choose the Correct Strip Type
Command strips come in different types:
- Picture hanging strips
- Utility strips
- Heavy-duty strips
- Outdoor strips
Using the wrong one can cause:
- The item falling off
- The strip pulling paint due to overload
Always check the packaging for:
- Maximum weight
- Recommended surface type
Step 3: Apply Pressure Properly
Press the strip firmly for at least 30 seconds. This activates the adhesive.
Step 4: Wait Before Hanging
This is where many people fail.
Wait at least:
- 1 hour for small items
- 12–24 hours for heavier items
This gives the adhesive time to fully bond.
Step 5: Avoid Humidity
Bathrooms and kitchens create humidity and steam. Moisture weakens adhesive and increases failure risk.
If you must use them in bathrooms:
- Use heavy-duty strips
- Keep them away from direct shower steam
- Consider alternatives like suction hooks
How to Remove Command Strips Without Damaging Walls
Correct removal is the #1 key to preventing wall damage.
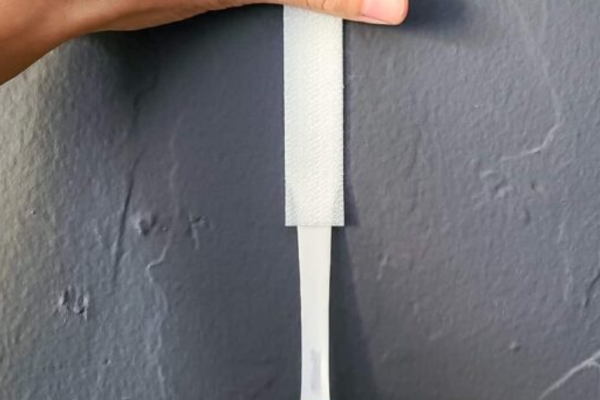
The correct removal method
- Hold the hook or item gently
- Find the strip’s stretch tab at the bottom
- Pull the tab straight down
- Pull slowly—do not jerk
- Continue pulling until it releases
What NOT to do
❌ Pull outward from the wall
❌ Twist the hook
❌ Rip it quickly
❌ Pull at an angle
Pulling outward is the fastest way to peel paint.
What If the Tab Breaks?
Sometimes the tab snaps off, especially if the strip is old or the adhesive has hardened.
Here’s what you can do:
Option 1: Use Dental Floss
Slide dental floss behind the strip like a saw. This helps loosen adhesive without pulling paint.
Option 2: Use a Hair Dryer
Apply low heat for 30–60 seconds to soften the adhesive. Then peel gently.
Option 3: Adhesive Remover
Use rubbing alcohol or adhesive remover on a cloth. Always test a small hidden area first.
How Long Can You Leave Command Strips On the Wall?
People assume leaving them longer is fine, but adhesives can become harder over time.
For best results:
- Short-term use (weeks to a few months) is safest
- Long-term use (years) increases risk of residue and paint pull
If you’re renting, it’s smart to remove and replace strips every few months if you plan to keep items up long-term.
Best Alternatives for Renters Who Want Zero Damage
If your walls are sensitive or your landlord is strict, consider these alternatives:
1) Tension Rods
Perfect for hanging items without adhesives.
2) Over-the-Door Hooks
Great for towels, robes, bags, and organizers.
3) Standing Shelves
Adds storage without wall contact.
4) Magnetic Hooks (for metal surfaces)
Useful for fridges, metal doors, and cabinets.
5) Suction Hooks
Good for smooth tile and glass (especially in bathrooms).
Conclusion
So, do command strips damage walls?
Most of the time, they don’t—as long as you use the correct strip type, apply it to a clean smooth surface, respect the weight limit, and remove it using the stretch-release tab method. But on low-quality paint, textured walls, or in humid bathrooms, command strips can peel paint or tear drywall.
For renters, the safest approach is to test a small area first, avoid overloading, and remove strips slowly and correctly. With the right technique, you can decorate your apartment beautifully without losing your security deposit.